What Do Tree Removal Companies Do with the Wood?

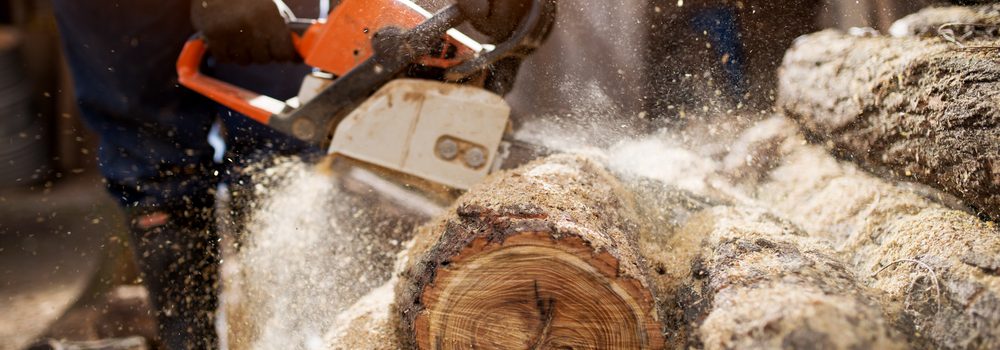
What happens to the wood when happens to the wood when you have a tree removed from your yard? This is a question that many people have, and it is a valid one. Tree removal companies can do a few different things with the wood, depending on their preferences and what you want them to do with it.

In this article, we will discuss some of those options to make an informed decision about what you would like done with the wood from your tree.

1. They Can Sell It

Tree removal companies have one option: to sell the wood they remove from your yard. This can be a good option for them, allowing them to make some money off their work. Additionally, it can be a good option for you, as it means you can get cash back for the removed wood.

2. They Can Use It

Another option that tree removal companies have is to use the wood themselves. This can be a good option for them, as it allows them to save money on the wood they use. Additionally, it can be a good option for you, as it means you will not have to worry about getting rid of the wood.

3. They Can Donate It

Another option that tree removal companies have is to donate the wood they remove from your yard. This can be a good option for them, as it allows them to give back to the community. This allows everyone involved, including both parties in this process-the customer as well as those who work at removing trees -to feel like what’s being done serves some greater purpose than just making money off someone else’s property

4. They Can Mulch It

Did you know that tree removal companies can turn wood from removed trees into mulch? Mulch is an excellent addition to any garden or landscaping project, helping to conserve moisture, suppress weeds, and improve the yard’s overall appearance. Some tree removal companies will offer mulching services, grinding the wood on-site, offering it for sale, or even delivering it directly to your doorstep.

Before hiring a tree removal company, inquire about their mulching options and see if they can provide you with an eco-friendly and cost-effective solution for beautifying your outdoor space. Plus, using wood from removed trees helps to reduce waste in landfills and supports sustainable gardening practices.

5. They Can Burn It

While it may come as a surprise to some, tree removal companies do not always immediately turn to recycle or repurposing the wood they remove. One option they may consider is burning it. While this might seem like a waste of valuable resources, this approach has several benefits.

Burning the wood can generate heat for homes and businesses, provide an environmentally friendly alternative to fossil fuels, and offer an efficient way to dispose of large quantities of wood in a controlled manner.

However, homeowners and property managers must consider all options when choosing a tree removal service. Sustainable forestry practices and finding creative ways to recycle or repurpose the wood should also be a priority for individuals and companies in the industry.

6. They Can Send It to a Facility

When a tree removal company cuts down a tree, they have several options for disposing of the wood. One option is to send it to a facility where it can be processed into lumber, firewood, mulch, or biofuel. This not only helps to recycle the wood and reduce waste, but it can also provide an additional source of income for the tree removal company. Homeowners looking to remove a tree can request that the wood be sent to such a facility instead of being chipped or hauled away.

Relevant Topic : How do you protect yourself Dangers of Wood Dust

7. They Can Recycle It

Rather than letting it go to waste, they turn it into valuable products like mulch, wood chips, and even furniture or building materials. Not only does this reduce overall waste, but it’s also a sustainable and eco-friendly approach to tree removal. If you’re considering having a tree removed from your property, inquire about their recycling program and see how you can contribute to this green initiative.

8. They Can Use It for Firewood

One option is to use it as firewood. The thickness and length of the wood determine whether it can be used for smaller fires or larger ones in fireplaces or outdoor pits. The tree removal company may also sell the firewood to individuals or businesses in need of fuel for their fires. Before cutting and selling the wood as firewood, arborists will often let it a season, allowing moisture within the wood to dissipate, resulting in a cleaner burn.

So next time you need some wood for your fireplace or outdoor pit, consider purchasing from a local tree removal company – you’ll be keeping debris out of landfills and supporting a local business simultaneously.

Conclusion

When deciding what to do with the wood from a removed tree, there are a few things to consider. Landfills are an easy option for tree removal companies but they are not environmentally friendly. Mulching and composting are more environmentally friendly options, but they require extra preparation from the tree removal company.

If you have the space, you could ask them to leave the wood on your property so you can repurpose it yourself. Whatever you decide, ask your tree removal company about their policies regarding disposing or repurposing the wood from removed trees.

Panorama view of modern rooftop terrace with dark wood deck flooring, plants, brick fence and black garden furniture P

7 Tips for Building a Deck

Building a deck is one of the favorites DIY projects that most fathers have. It is ambitious yet very rewarding when done correctly. Imagine having a deck without paying someone to build it for you.

Before embarking on this ambitious project though, here are some tips that you can use to build a great and lasting deck.

Design a Deck with Covered Joists

The joists of your deck need to stay dry yet occasionally, it can get wet like when it rains. Just make sure that water won’t stay in it for long. A tip, add a drip edge at the end of your joists to prevent rainwater from staying in it when raining.

Be Wary When Placing Screws

Sinking your screws too deep will create a reservoir on your deck hence when it rains, the water can stay in it. Leave the head of your screws visible and if you need weight on your board, you can put something heavy on top of your board.

Protect Your Deck from Wild Visitors by Adding a Diamond Lath

Adding a Diamond lath at the back of your deck is an effective way to discourage skunks and raccoons from visiting your deck. Sometimes, these unlikely visitors also build their home under decks – and who wants to co-live with skunks or raccoons?

Choose Your Wood

There are a lot of options when it comes to the type of wood to use. You can consider availability, price, and durability.
Highly durable wood is more expensive than other types of woods but considers it as an investment. There is no use using cheap wood that will need replacement after five or ten years.

You also have to consider the color of the wood to use and if you can dye or stain it to turn it into the shade you want.

Put a Distance between Boards

Placing gaps between boards is necessary to prevent debris from building up. It is also a great way to drain water. Make sure there is enough space to allow water to flow and prevent clogging. The general rule is that when you sweep, the debris should fall freely on the gaps.

Place Deck Fasteners Under

Under-mounting your deck fasteners wouldn’t just give your boards a cleaner look, it will also prevent water damage on the holes you created with your screws. This style is very tedious though and it even requires a metal bracket on the side. The long-term effect is all worth it though.

Reliable and Maintenance-Free Deck Posts

You can make your deck posts maintenance-free by wrapping it with PVC Column Wrap. Use the wrap to protect the deck post from water damages among others. Just simply glue and clamp the wrap on the deck.

In addition, you can also install maintenance-free balusters such as those metal ones. These balusters don’t need paint or any changes and only use hidden connectors. It means no drilling required to install it.

With these 7 tips in building a deck, you are now ready to start your most ambitious project yet. If you’d instead like help from a professional, we recommend Richmond Deck Pros, a deck builder Richmond VA relies on for the highest standard deck construction. They offer new deck installation, screened-in porches, sunrooms, pergolas, and more. Better still, you can get a free estimate and design consultation if you tell them we sent you.

Now go out there and make an incredible outdoor living space you and your family will love!

Dangers of Wood Dust: Close up of a lumberjack cutting old wood with a chainsaw.

How do you protect yourself Dangers of Wood Dust

Dangers of Wood Dust

Health authorities in Canada have warned woodworkers of the hazards of constant exposure to wood dust. As the Canadian Center for Occupational Health and Safety and the International Agency for Research on Cancer put it, wood naturally contains dangerous chemicals such as molds, fungi, and bacteria.

Because of the dangers associated with wood dust, there are certain occupations that are considered at risks such as works in the construction, furniture and wood carpentry, logging, sawmills, and carpenters.

Risks Associated with Wood Dust

  • Dust particle inhalation

Occupational asthma and lung cancer are among the common health problems associated with constant dust exposure. It can start with breathing problems. Here you can learn more https://www.cancer.gov/about-cancer/causes-prevention/risk/substances/wood-dust

  • Eye Damages

Wood dust is a small particle that floats in the air. It is too small that it can easily enter your eyes and cause irritation. Eye irritation can cause eye damage when not taken seriously. Just imagine how much you rub your eyes when it is irritated.
Skin Problems

Constant exposure to wood dust can also irritate your skin. It can cause skin irritation, dermatitis, and ulceration.

How to Protect Yourself from Wood Dust?

In order to protect workers who are in the wood industry, here are some things that they should do (or their company should observe during work hours).

Know your wood – each type of wood has its own type of dust. Knowing the type of wood you are working with will help you protect yourself better against unknown wood chemicals.

Work in a ventilated area – if you are working in a closed environment like carpenters who are in making cabinets in a specific room, make sure that your work area is fully ventilated.

Keep your tools sharp and properly maintained – using dull tools or poorly maintained carpentry tools will only release more dust in the air.

Maintain a clean working station – after each workday, make sure that your work area is properly cleaned. Use a vacuum with a HEPA filter to remove even the smallest dust particle.

Wear proper work outfit – wear masks or clothing with respiratory protection to minimize the possibilities of inhaling dust and other wood particles while working. In addition, keep your hands and face clean by constantly washing it with clean water.
Controlling Wood Dust Exposure

Dying and Staining Wood

Dying and Staining Wood

Coloring wood is a process of dying and staining wood. It is an art, a finishing touch to beautiful woodwork. Dying and staining are different processes though and can provide different results. 

Dying

A dye can be synthetic or natural. Natural dyes are those extracted from herbs ad plants such as from indigo, beets, coffee, and tea. Mauveine is another popular purple dye discovered in the 1850s. With the popularity of dyes, synthetic dyes were also introduced.

Dying wood is not the same as coating the wood. This process simply allows the dye color to bond with the natural color of your wood to give it a different shade. One thing to remember is that dyes are transparent when used in wood. If you use red dye, it can give your wood a red color unless your wood has a natural color like yellow. When red is combined with yellow – you will get an orange wood. 

Staining

Staining Woods For Home Elements
Credit Bradshaw

Staining is premixed colors (solid colors). When used, it bonds with the original color of the wood and covers irregular surfaces such as scratches or wood pores. It is often used to smoothen woods with large pores such as oaks. The pores darken by staining it then it is sanded to make it smoother. 


When to Use Dying?

Dying wood class
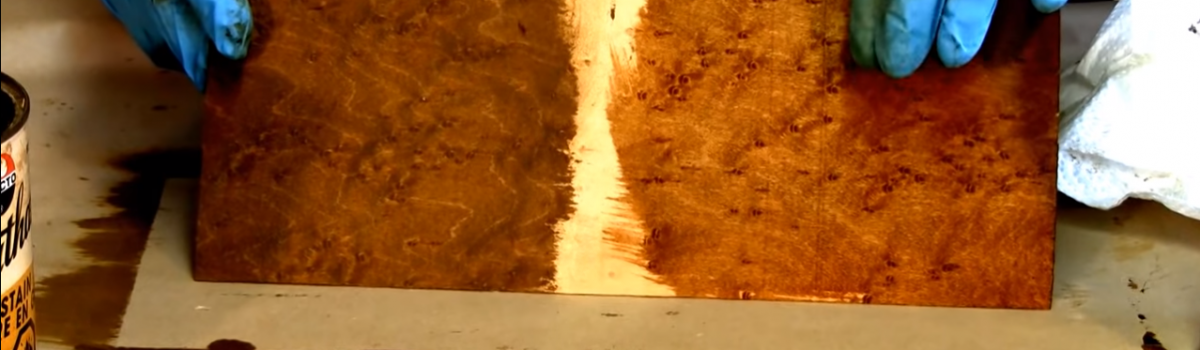
Dying should be used to put emphasis on fine wood grains such as walnut burl or bird’s eye maple. It is also used for dense woods like hard maple. You can also use dying to balance the color of walnut sapwood. Lastly, dying is also highly recommended if you are working with a blotch-prone wood, say pine tree. 

When to Use Stains

Staining is used if you are working on wood with coarse textured grains. It is a great way to put emphasis on the wood’s contrasting color. 

If you are working on furniture that is often placed outdoors, staining is also recommended. The pigments you used will provide more protection to the furniture once placed outdoors and under direct sunlight.

Pros of Using Wood Dye

  • Availability

Whether you need a natural or synthetic dye, you can easily find one. Dyes are available as solvent or binders and in different color or shade. 

  • Very Effective

Dyes work like paint. You can apply the first and second coating and it won’t even affect the color of the dye you are using. The wood will just absorb it all. 

Pros of Using Stain

  • Very Effective 

With stain, you can cover the entire surface that you wanted to cover. Say it is a large pore on your wood’s surface, just stain it completely to cover the pore. 

  • Fast Result

It only takes a few minutes for the stain to dry up and affect the wood’s color. 

The color you get on the first coat is the final color. It won’t go darker because the tannin of the wood has already reacted. Your first coat is also your final coat when staining. 

To dye or to Stain?

Before deciding whether you want to dye or stain your wood, consider a few factors first such as the advantages of using each process, the type of wood you are working on, and the availability of the dye or stain in your market. 

Wood Ebonizing Tips & Solution

Top 3 Things You Should Know About Ebonizing Wood

Ebonizing Wood

Ebonizing is a process of staining wood naturally without affecting its natural beauty. It is a way to put emphasis on your wood’s graphic look. Ebonizing is also called iron staining.

1. Things to Consider When Ebonizing

The wood to use

Ebonizing relies on iron and how it will react with the wood’s natural tannic acid. If your wood doesn’t have enough tannic acid, you might not get the result that you want. The limited tannic acid in wood leads to unpredictable ebonizing results.
For the best result, it is best to oak. Oak is known for its high tannic acid content. Walnut is another reliable option if you want to do ebonizing.

The solution to use

You also have to consider the solution you are using. One technique you can try is to use an organic tannic acid first. It will help in saturating the wood’s fiber. For the rusty nails, soak it in water with iron solution for weeks. The downside of using a solution rather than relying on the natural tannic acid of the wood is the finished product – it produces bluish tint on the wood.
You can try to add other colors to reduce the bluish mark but more often than not, the result is not as good as natural ebonizing.

2. Different Ebonizing Solutions to Try


Steel Wool and Vinegar Solution

You will need 12-pad steel wool, lacquer thinner, a gallon of vinegar (white), and containers. Remove the excess oil from the steel wool by washing it with lacquer thinner. Wash it three times. Leave it to dry.

Put the steel wool pads in a bucket and pour the white vinegar. Make sure it is totally submerged. You will know that it is working once bubbles start to appear. Keep the steel wool submerged for up to 3 days. Stir it occasionally to ensure that all sides are submerged in white vinegar. Strain the vinegar solution. Now you have a solution to ebonize your wood.

Bark Powder Tea and Vinegar/Iron Solution

Another solution that you can use to increase the tannic acid of wood is bark powder tea with vinegar. This is a very easy solution to make. First, you have to soak your wood with bark tea. Leave it for the wood to absorb the tea.
Now add your vinegar and iron solution to the wood. Wait for the solution to be absorbed by the wood again. Rinse it with bark tea afterward.

3. What to Do Before Ebonizing Wood?

Sand your wood

Before applying any solution to your wood, sand it first. Use fresh paper for sanding to avoid burnishing your wood. If you are using a bark powder tea explication, soak your wood after sanding. Make sure it is completely submerged in your bark tea solution. Afterward, you can add your vinegar/iron solution.

Wash your wood

After applying each solution, always wash your wood. Rinse it to remove residue. Washing it with clear water also helps you check if you got the stain you wanted or if you need more bark tea to add shade to it. If you find a spot with a lighter stain, sand, and soak that part again with your bark tea solution.

Ebonizing might sound simple to most but even the most experienced in this craft find it challenging to ebonize and get the color they want. Inconsistencies and varying results are often experienced especially with a different kind of wood being used. This only shows that if you found a piece of furniture with great ebonized wood – then you know that it was created with love and passion!

Woodworker working on sharpening tools

How to Sharpen Woodworking Tools – Top Five Sharpening Systems

Aside from skills, woodworkers need a properly maintained and sharpened hand tools in order to produce beautiful wood crafts. Most woodworkers will tell you this – you don’t need expensive and amazing tools – you only sharp ones!

Why Sharpen Your Tools? 

Properly maintained and sharpened tools are easier to use. They cut faster and doesn’t cause resistance. If you are sanding, it will leave a smoother surface. When cutting, it can give you cleaner cuts. Using sharper tools can also mean that you can finish your job faster. 

Top Five Sharpening Systems

Choosing a sharpening system to use depends on the woodworking tools you have. Don’t just purchase a sharpening tool because it might not work well with your tools. 

Here are some of the sharpening systems that you can consider.

#1: Venerable Benchstone System

Benchstone is a traditional stone sharpening tool. It is also called a sharpening stone. There are three types of sharpening stones called diamond stones, water stones, and oilstones. 

This type of sharpening system is very popular because of its ease of use. It can sharpen any edge of any tool. It is also man-made. Despite having an abrasive material when used, Benchstone remains to be one of the most popular sharpening systems in the woodworking world today

#2: Motorized System

Professional woodworkers who love investing with their tools often purchase a motorized sharpening system to keep their tools in condition. This is the most costly among all sharpening systems. 

Unlike a bench grinder, the motorized system works more slowly and doesn’t cause overheating. Over-heating when sharpening tools can affect the hardness of a tool. With slower speed, a motorized system can make the sharpening process easier to control and safer. 

#3: Scary Sharp System

A scary sharp system uses sandpaper to sharpen tools. It is scary sharp because it can really make your tool ‘scary sharp’. You can either use wet or dry sandpaper and some lubricants to start sharpening your tool. 

Scary sharp system is one of the cheapest sharpening options out there. 

#4: Water-Cooled Sharpening System

Water-cooled sharpening system is one of the most popular sharpening system known today because of its reliability and flexibility. This machine can be used to sharpen skews, gouges, and chisels without changing the bevel angle. 

For its price, this system is very competitive in the market. Furthermore, it can be used to sharpen different woodworking accessories without affecting the geometrical cut of the tool. This means every time you are sharpening your tool, your Water-Cool Sharpening System is only removing a minimal amount of material from your tools.

#5: Work Sharp Sharpening System

The Work-Sharp Sharpening System is a new system introduced in the woodworking world. This system is a combination of Scary Sharp and Motorized Sharpening System. One of its advantage though as a hybrid sharpening system is its water-coolant system. 

This system also comes with an integrated ceramic-oxide hence you don’t just sharpen your tool, you also remove burrs from the edge of the tool. 

The pricier WS3000 is better than the WS2000 because it comes with an additional port for chisel and iron tools. Using it is very easy with fast results. 

Are You Ready to Choose Your Sharpening Tool? 

Aside from the type of tools you are using, you also have to consider the ease of use and budget when picking your sharpening system. If you are not sure, it is best to do your research first and ask for help from your woodworking buddies.